Game Update

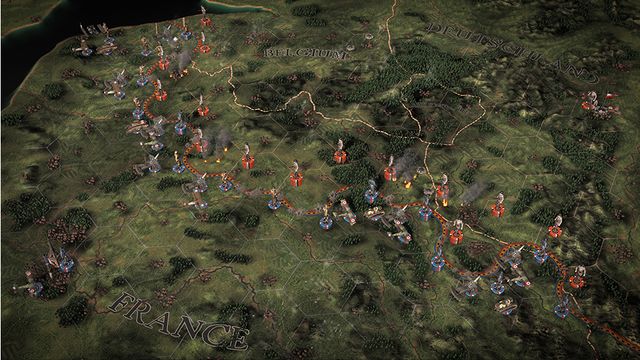
The Great War: Western Front puts you in an all-encompassing ‘Dual Commander’ role, allowing players to take control of the war effort at both a grand strategy and real-time strategy level. This means that whilst you can oversee the war and plot a long-term strategy for victory, you can also put your boots on the ground, command any battle, and influence its outcome.
The latter will see you in the role of Field Commander – the individual in charge of all aspects of a battle as it takes place, including all tactical and strategic elements of trench warfare. WW1 on the Western Front was defined by these battles in the trenches – gruelling, exhausting conflicts that saw both sides fight punishing battles for vital territories.
In this article, we’re taking a closer look at all the key areas of trench warfare in The Great War: Western Front – from pre-battle planning, to performing effective co-ordinated attacks, to defending your ground from astute enemy moves.

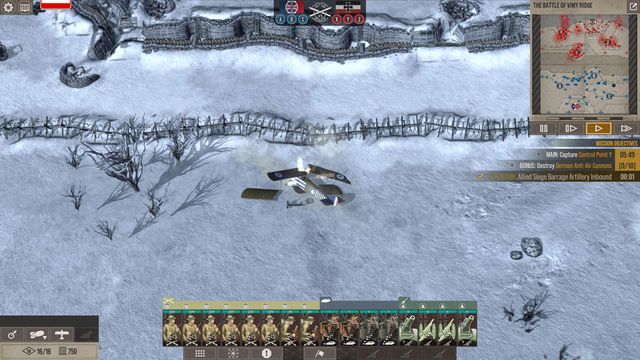
Before every battle in the Campaign, Field Commanders have time to prepare their side for the battle ahead. This pre-battle phase allows you to lay trenches, support, fortifications, and more to support your tactics and your troops.
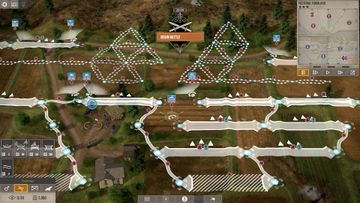
A key factor during the pre-battle period will be laying down a network of trenches, which give your units the support, safety, and strategic advantage they need on the ground. You have the ability to select from a range of different trench types, before deciding where to dig them and how they connect to other nearby trenches. Types of trench range from a basic firing area, low on cover but allowing troops to fire over the top, to blockhouse trenches, which provide reinforced cover but do not allow attacks.
Location and layout of trenches is an important consideration, alongside their quantity. Smart placement of trenches can help establish fields of fire that work to your benefit, and staggering trenches across the battlefield can help your troops advance or retreat with more cover, compared to trudging across no man’s land. You will have control over all trench placement, apart from the Command Trench - the location where high-ranking officers would often be stationed, far away from the front line, to give orders and receive intel. The Command Trench for yourself and the enemy will already be on the battlefield, and if either side takes over the opposing Command Trench, along with all control points, they achieve total victory for that territory. As such, plan the placements of your trenches and defences to not just give you an offensive advantage, but also to protect your Command Trench as heavily as possible.
When returning to a battlefield, you'll find the remains of trenches from previous battles. Managing and repairing them, then adding additional trenches to reinforce your network, may well be the best course of action in this situation. Whether priming your side for an offensive move, or protecting them from an enemy onslaught, the logistics of your trenches will play a significant role in the outcome of any conflict.

Around the trenches, Field Commanders can also deploy additional resources to support their units. Place artillery batteries to execute long-range strikes and damage opposing fortifications. Install machine gun spurs on the ends of trenches to suppress enemy advances towards your location. Drop in barbed wire to slow the progress of the opposition’s troops, and potentially force their movement towards areas of the battlefield that better suit your tactical approach.
One final option to consider in your pre-battle plans reflects a cunning tactic employed during WW1: Undermining. Forces would secretly dig tunnels underneath the battlefield until they were directly below the front line trenches of the enemy. Explosives would be placed there and detonated for an indefensible direct strike.
Undermining is an offensive tactic that can be unlocked in The Great War: Western Front via research. In the pre-battle phase, choose the undermining option and select the area on the map you wish to strike. Once the battle commences, you can dictate when the explosion goes off, to ensure maximum damage and tactical advantage for your side. Successful undermining strikes can produce huge craters and significant losses for the enemy, creating a potential weak point in their defenses to target.
Utilising any of these options will require Supply, which is a resource you can buy throughout the Campaign. Ensure you are sufficiently stocked up on Supply before a battle, so you are able to use the trenches and defenses you want. However, overuse of Supply in battles could you leave short of options for future conflicts.
All of these preparations are conducted in the pre-battle phase – but eventually, the time for action will be upon you. As Field Commander, your attention must turn from items and resources, to the deployment and movement of your troops and weaponry.
Each battle will be its own unique concoction between defence and attack; a new scenario for you to strategise for. When it comes to attacking, going in all guns blazing at the first possible opportunity will rarely be the best way forward. Efficiency and timing are just as powerful as weapons and soldiers.
Use your trench networks to move forces around the battlefield with more protection, if you’re looking to advance on an enemy position. Consider how troops are spread across the trench line. Do you want to have more reinforcements in specific areas? If you are looking to capture a specific position, are you attacking it from one or multiple directions? Units can be given orders individually, or grouped together to move at the same time. Co-ordinate your plan of attack to give your soldiers protection and aim to overwhelm the opposition.
Movement through trenches is useful, but there will likely come a point in any battle where an attack is only possible by going over the top, into no man’s land. Just like the tactical warfare in WW1, this is a manoeuvre that must be taken with great care and consideration, or you risk significant losses. For such an aggressive offensive move, consider ways to protect your soldiers, and leave the enemy unable to defend themselves sufficiently.

A common strategy in WW1 for over-the-top offensives was to hinder the opposition’s visibility of the battlefield by deploying a rolling barrage of artillery fire, in front of their own troops. This would create a wall of smoke that prevented the enemy from seeing no man’s land, offering some protection for advancing units. Field Commanders in The Great War: Western Front can aim to replicate this tactic, ordering artillery fire on a specific position, just before their troops reach it. Of course, timing and co-ordination will be paramount, to ensure the smoke rises at the ideal time, and your soldiers are not caught in the explosions.
Aircraft can also be used as support for your troops on the ground during these moments. Conducting research and investing in new aircraft technologies will give you more potent airborne options during a battle. Deploying them as you are launching a ground offensive can help suppress enemy fire, wear down fortifications, and give your units a major advantage.
In these real-time strategy battles, though, it’s not just about conducting attacks and moving across the battlefield. Field Commanders in The Great War: Western Front will also need to strategise against enemy attacks, defending your position and resources.
Be it the Allied Forces or the Central Powers, your opposition will look to execute carefully-crafted attacks of their own. Be ready to repel offensive moves from multiple angles, defend yourself from fire on the ground or above, and protect your position on the battlefield at all costs.
In these defensive phases is where much of your pre-battle choices can come into play. If you laid down barbed wire in front of your trenches, this will help slow down the movement of enemy troops, and potentially move them into positions that suit your tactics. Machine gunning points across your trenches will also help limit the amount of opposing soldiers that make it into your trenches. Use your communications trenches to move your troops into the required locations. Keep firing trenches across the front line well-manned, to further push back enemy advances. If you laid down blockhouse trenches, moving your troops into these heavily protected areas will limit losses from artillery and air attacks.

Enemy forces can conduct their attacks in waves, meaning you may need reinforcements to hold your ground. Once again, make sure you order your infantry into the right locations, and have adequate numbers in key areas of conflict, to ensure you maintain position. Your opposition will be cunning, strategic, and astute in how they attempt to overpower you. Be ready with forces, fortifications, and tactical judgement to push them back.
Throughout the Campaign in The Great War: Western Front, to achieve total victory, you will likely battle on certain territories multiple times – and thanks to the living persistent world, the trench warfare at these territories will differ each time. Damage dealt, and fortifications laid, in previous conflicts will remain upon your return, changing the dynamic of the next battle. Your trenches, for example, can be reused, upgraded, re-laid, or even potentially used by the enemy.
Weather will also affect the dynamics of trench warfare. In heavy rain, for example, artillery fire can be less effective, as the mud and soft ground cushions the shelling. In colder conditions, troop movement and morale can drop, potentially lessening the effect of your on-ground attacks. All of these elements should be factored into your strategy as a Field Commander, and you’ll be able to adapt your tactics for every Campaign battle.
In Historic Battles – where you will drop into six pivotal battles of WW1, and aim to complete objectives – you will exclusively take the role of Field Commander, and handle the real-time strategy of your side, giving orders and making decisions to turn the battle in your favour. The parameters of that battle, however, such as the location, condition of the land, fortifications in place, and resources at your disposal, will already be set, based on the conditions on the real battle. It will be down to you to make the best of each scenario, and plot a path to victory.
Whether you’re executing a clinical offensive move and taking enemy territory, or resolutely defending your position from wave after wave of attacks, trench warfare in The Great War: Western Front is a constant tactical test. Deploy units and resources smartly, and co-ordinate your plans with expert timing, to tip the balance of a battle in your favour.
Wishlist The Great War: Western Front now on Steam and Epic Games Store, ahead of launch in 2023. For more insight and news, make sure to follow us on Twitter and Facebook, and subscribe to our YouTube channel to see gameplay and more.


 Close
Close